Guide
Building a Danish Customer-Facing AI Agent with MitID Authentication in Microsoft Copilot Studio
How to give a Copilot Studio agent real Danish identity verification with MitID through a certified broker, set up end to end as a proof of concept in a single afternoon.

If you’re building AI agents for Danish customers, sooner or later you’ll hit the same wall: The moment the agent needs to access personal data, you need real identity verification. And in Denmark, real identity verification means MitID.
The challenge: MitID isn’t something you just plug into Microsoft Copilot Studio. There’s no native connector. So how do you get a Microsoft-native AI agent to authenticate Danish users with the country’s national eID — without spending months on a production broker agreement, and without needing to use your own personal MitID for testing?
The following article explains step-by-step how to build it as part of a POC in one afternoon.
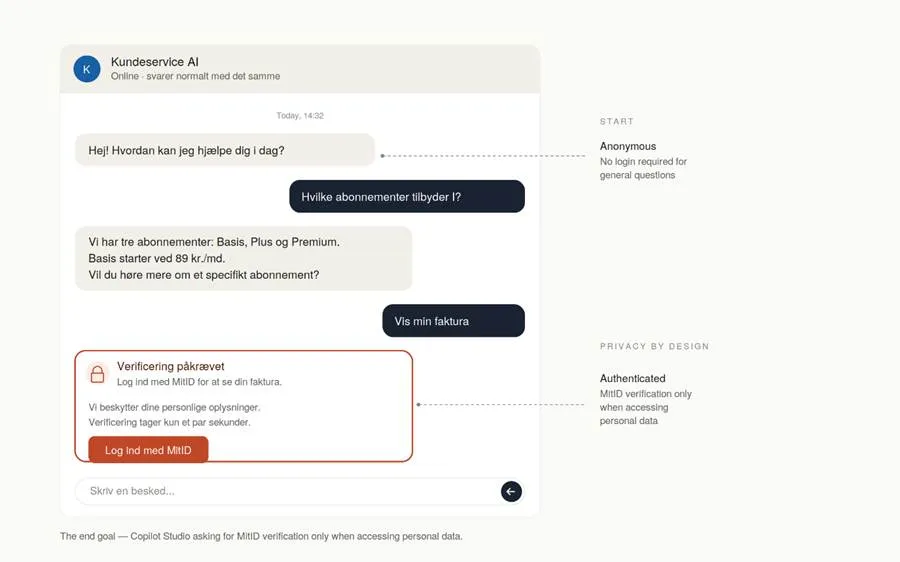 Illustrative example of a possible final result
The architecture decision
Copilot Studio offers three authentication options out of the box:
- No authentication — anonymous, fine for general FAQs
- Authenticate with Microsoft — workforce Entra ID, built for employees in your tenant.
- Authenticate manually (Generic OAuth 2.0) — the catch-all that works with any OIDC provider
For external Danish customers, only the third option is viable. Under “Generic OAuth 2.0” you have a few real choices:
- Microsoft Entra External ID — Microsoft’s CIAM platform
- Third-party CIAM like Auth0 or Okta
- MitID via a certified broker — options include Signicat, Nets eID Broker, IN Groupe, and Idura (formerly Criipto)
For a customer-facing agent that handles billing, contracts, or anything regulated, MitID via a broker is the only option that meets NSIS substantial assurance — which Danish law often requires.
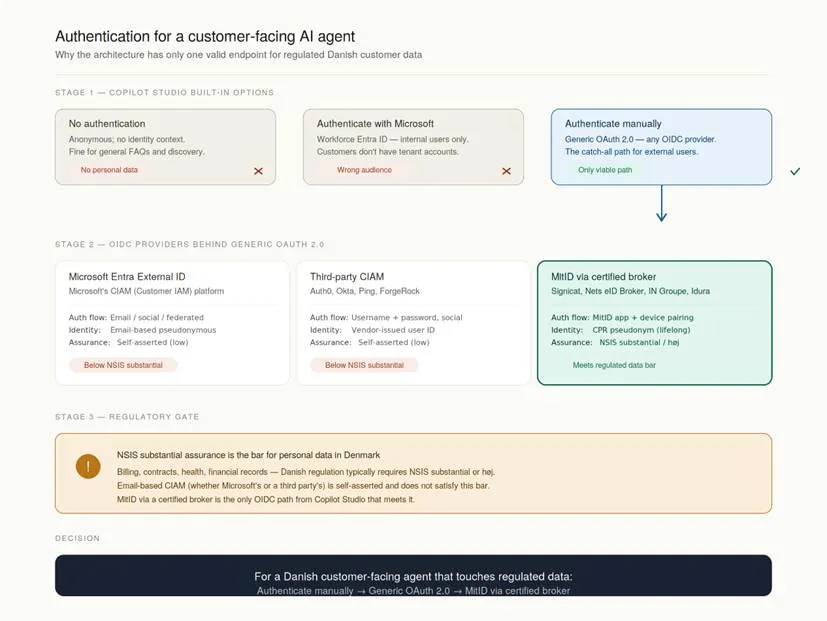 Overview of authentication methods in Copilot Studio
Why a broker
You can’t talk to MitID directly as a private company. You go through one of the certified brokers, who handles the MitID protocol, certificates, and legal onboarding. Your application talks plain OIDC to the broker. Each broker has its own pricing model, developer experience, and feature set — worth evaluating against your specific requirements.
For this POC I used Idura because it offers a free, time-unlimited sandbox that doesn’t require a credit card or production agreement. Other brokers like Signicat have similar test environments, so the steps below will translate with minor URL and parameter adjustments. The Copilot Studio side of the integration is broker-agnostic — Generic OAuth 2.0 against an OIDC endpoint is the same regardless of which provider sits behind it.
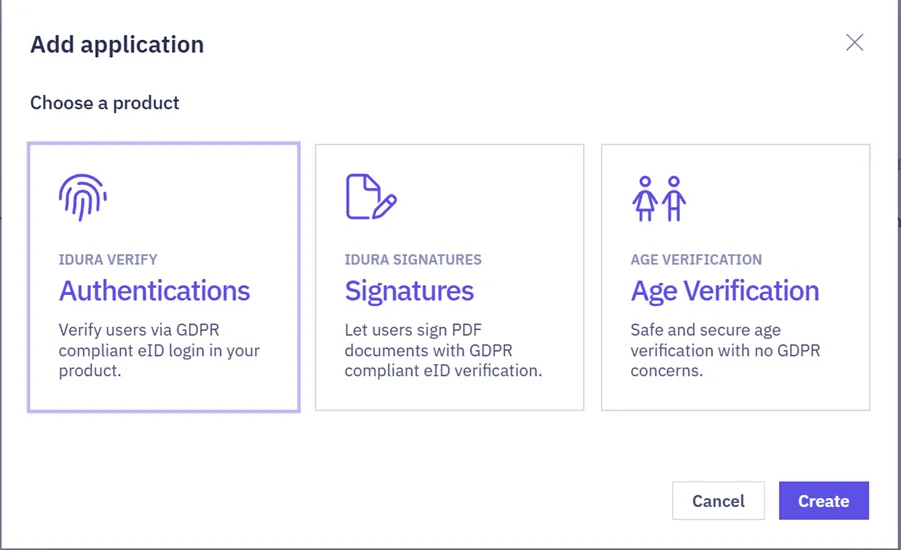
Step 1 — Set up the broker (example: Idura)
For Idura, sign up at the broker dashboard and pick a tenant subdomain — your OIDC domain becomes yoursubdomain.idura.broker. Other brokers follow a similar pattern with their own domain conventions.
Create the application:
- Applications → Add login application
- Technology: select Other → enter “Microsoft Copilot Studio”
- Callback URL:
https://token.botframework.com/.auth/web/redirect - Click Create
This callback URL is fixed — it’s where Copilot Studio’s bot framework receives the OAuth redirect for all manual authentication, regardless of which IdP you use.
Step 2 — Enable MitID and generate credentials
Inside the new application:
- Find eID methods in the sidebar
- Toggle on Danish MitID
- Open the OpenID Connect section
- Enable OAuth2 Code Flow
- Generate a Client Secret — copy it immediately, it’s only shown once!
- Copy the Client ID from the application overview
You should now have three values:
- Client ID
- Client Secret
- Domain (e.g.
yoursubdomain.idura.broker)
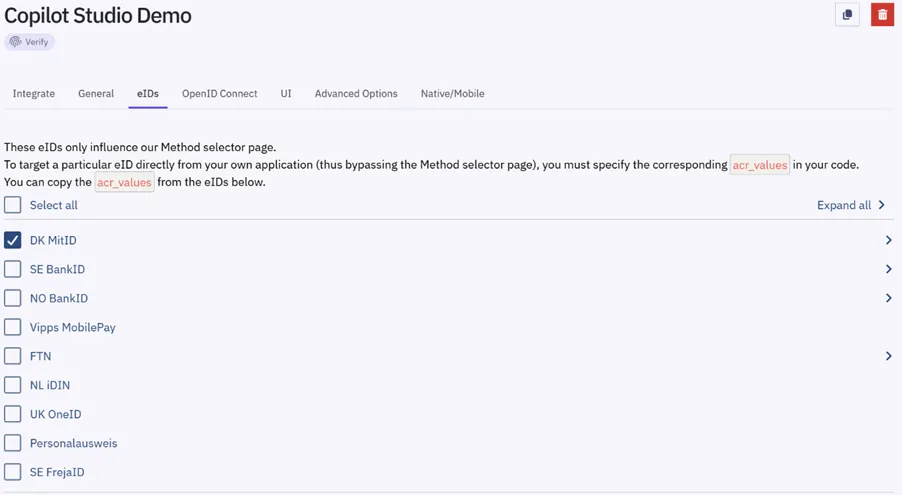 Selection of eIDs
Step 3 — Verify the OIDC endpoints
Before configuring Copilot Studio, verify your endpoints by opening this URL in a browser:
https://yoursubdomain.idura.broker/.well-known/openid-configuration
This returns the OpenID Connect discovery document. Look for these fields:
authorization_endpointtoken_endpoint
Copy these exact values. You’ll paste them into Copilot Studio next.
This step saves hours of debugging. If you ever hit a 404 during the OAuth flow, the discovery document is the source of truth — typos in the endpoint URLs are the most common failure mode. Every OIDC-compliant broker exposes a discovery document at this same path.
Step 4 — Configure Copilot Studio authentication
In your Copilot Studio agent: Settings → Security → Authentication → Authenticate manually.
Fill in the form (replace the domain with your broker’s actual domain):
| Field | Value |
|---|---|
| Service provider | Generic OAuth 2 |
| Client ID | From broker |
| Client Secret | From broker |
| Scope list delimiter | space |
| Authorization URL template | https://yoursubdomain.idura.broker/oauth2/authorize |
| Authorization URL query string template | ?response_type=code&client_id={ClientId}&redirect_uri={RedirectUrl}&scope={Scopes}&acr_values=urn:grn:authn:dk:mitid:substantial&state={State} |
| Token URL template | https://yoursubdomain.idura.broker/oauth2/token |
| Token URL query string template | Leave empty |
| Token body template | grant_type=authorization_code&client_id={ClientId}&client_secret={ClientSecret}&code={Code}&redirect_uri={RedirectUrl} |
| Refresh URL template | https://yoursubdomain.idura.broker/oauth2/token |
| Refresh body template | grant_type=refresh_token&client_id={ClientId}&client_secret={ClientSecret}&refresh_token={RefreshToken} |
| Scopes | openid profile |
The critical piece is acr_values=urn:grn:authn:dk:mitid:substantial in the authorization query string. This tells the broker “use MitID at substantial assurance level” — required for accessing personal financial data under Danish regulations. Lower assurance levels work for testing but aren’t appropriate for production financial data.
Important: set “Require users to sign in” to OFF. This enables the hybrid pattern (anonymous by default, authenticated on demand) we’ll cover next.
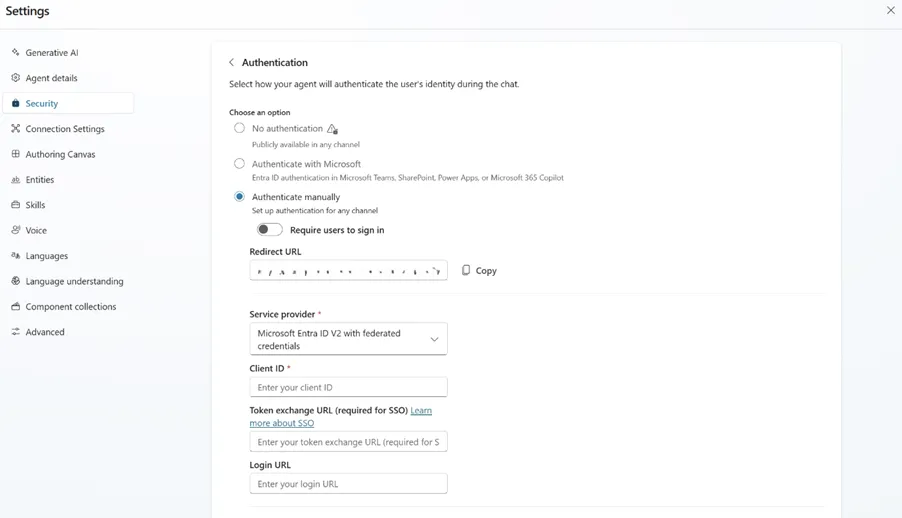 Security configuration in Copilot Studio settings
Step 5 — Publish the agent
Save the authentication settings, then click Publish in the top-right. Wait for the success confirmation.
This step is non-negotiable. Authentication settings only take effect after publish — you can spend an hour debugging why login isn’t triggering, only to realize you forgot to publish. Speaking from experience.
Step 6 — The hybrid pattern: anonymous by default, authenticated on demand
Here’s the design pattern that makes this both performant and compliant:
The agent is anonymous by default. Users can ask general questions — opening hours, plan comparisons, FAQ — without any login. The moment they ask for personal data, the specific topic forces a MitID sign-in mid-conversation.
This isn’t just better UX. It’s also better economics — MitID charges roughly 0.28 DKK per login, regardless of broker. Forcing every user to authenticate before they can ask “what are your opening hours?” is inefficient.
Authentication is invoked inside individual topics that need it, using the Authenticate node.
To build a topic that uses authentication:
- Topics → + Add a topic → From blank
- Name it specific to the use case: “Show my bill”
- Add trigger phrases: “vis min faktura”, “min regning”, “hvad skylder jeg”
- Add a Message node explaining why authentication is needed: “Jeg skal lige verificere din identitet med MitID for at vise din faktura.”
- Add an Authenticate node (+ → Advanced → Authenticate)
- Under the Success branch, add an HTTP Request node to fetch the customer’s data
- Under the Failure branch, add a fallback message
Step 7 — Use the access token to fetch customer data
After successful authentication, Copilot Studio exposes the OAuth access token as System.User.AccessToken. Pass this to your backend API as a Bearer token, and your backend uses it to look up the authenticated customer’s data.
In the HTTP Request node:
- Method: GET
- URL:
https://your-billing-api.com/customer/me/billing - Headers:
Authorization: Bearer {System.User.AccessToken}andContent-Type: application/json
Your backend validates the token against the broker’s JWKS endpoint (also in the discovery document) and extracts the user’s identity from the sub claim — which for MitID is a CPR pseudonym. You then look up that customer’s data and return it.
For a POC where you don’t have a real backend yet, Power Automate is an easy substitute. Build a flow that accepts the token, returns mock billing data, and use its trigger URL as the HTTP endpoint. The agent doesn’t know — and shouldn’t care — whether the data comes from a production system or a mock.
Alternatively, you can skip this step and add a simple “success” message action after the authentication if only used for POC purposes.
Step 8 — Testing without your personal MitID
This is the part that trips up almost everyone the first time.
When you trigger authentication in your test agent, you’ll be redirected to MitID’s pre-production environment. It looks identical to the real MitID login screen — but you cannot log in with your personal MitID credentials. The pre-production environment is fully isolated from production. This is intentional and correct from a security standpoint, but it means you need a test identity to proceed.
Here’s the exact setup that worked for me with Idura:
Create a test identity at pp.mitid.com
The MitID pre-production environment hosts a self-service portal at pp.mitid.com where you can create test users. This is the same environment that your broker forwards you to during the OAuth flow.
- Go to pp.mitid.com
- Create a test user — you’ll set a username and walk through the same registration steps a real Danish citizen would go through for MitID
- Crucially, instead of pairing a real mobile MitID app, the test environment lets you pair an authenticator simulator — a browser-based emulation of an Android or iPhone running the MitID app
The simulator runs entirely in your browser and behaves like a real MitID app for the purposes of the test environment: it receives notifications, displays QR codes, and lets you approve login attempts.
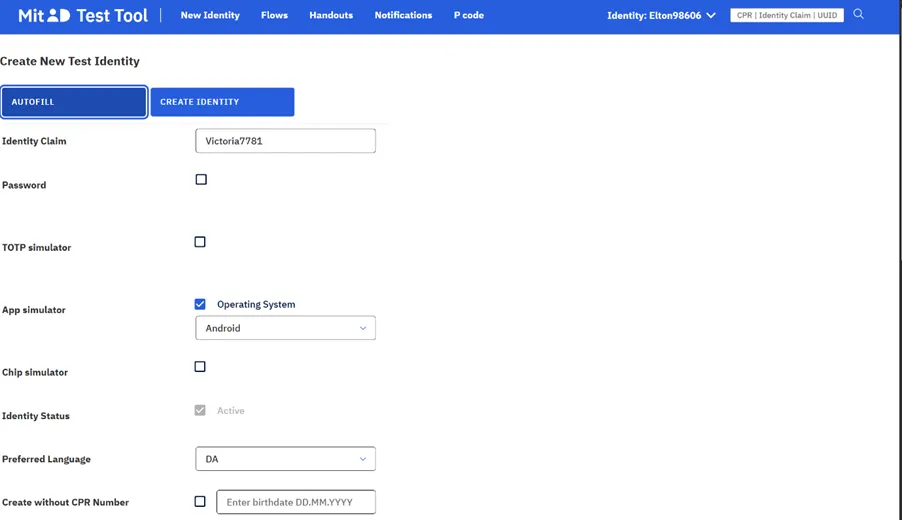 MitID Test Tool environment
How the test flow works end-to-end
Once your test user is created and the simulator is paired:
- In your Copilot Studio test pane, trigger the authenticated topic
- The agent shows the sign-in card — click it
- The MitID pre-production login screen appears with a QR code (or a numeric session code)
- Open the authenticator simulator in another browser tab
- The simulator detects the login attempt — scan the QR code or enter the session code
- Approve the login in the simulator
- The MitID page completes the flow and redirects back to Copilot Studio
- Your authenticated topic continues with the access token populated
The flow takes about 20 seconds total once you’re set up. The first time involves some tab-switching between the MitID login page and the simulator, but it becomes muscle memory quickly.
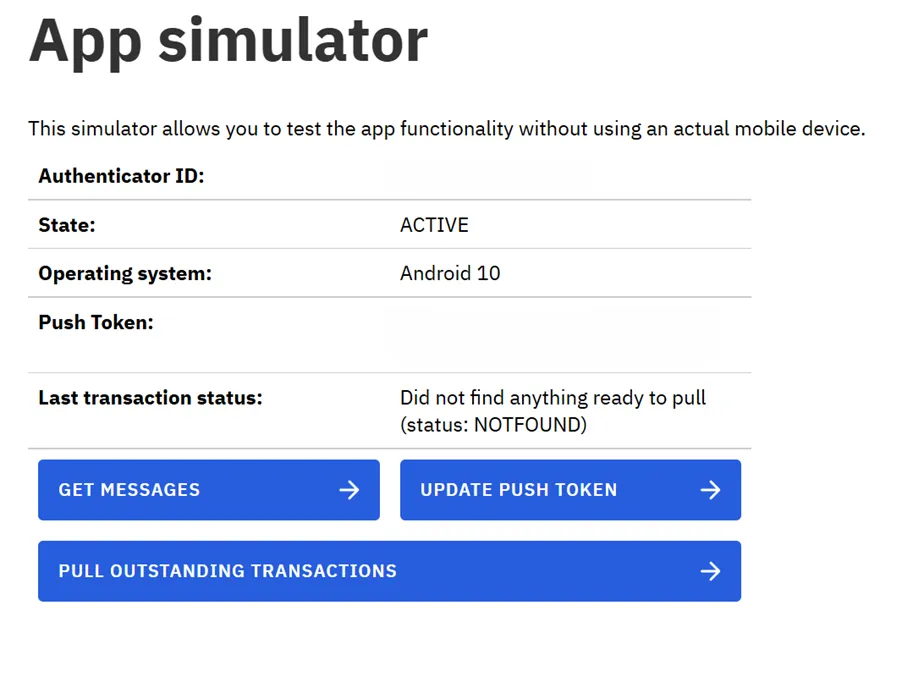 MitID app simulator
Tips that saved me debugging time
A few things worth knowing before you start:
- Set up the simulator before your demo, not during. The pairing process takes a few minutes and isn’t something you want to do live.
- Keep the simulator tab open in a second browser window during testing — easier to glance between Copilot Studio and the simulator than tab-switching repeatedly.
- The simulator persists your test user. Once paired, you can reuse the same test identity for every login during development. You only need to repeat setup if you want a different test persona.
- Lower the assurance level during development. In your Copilot Studio Authorization URL query string, change
acr_values=urn:grn:authn:dk:mitid:substantialto:lowfor faster test flows. Switch back before production.
Adjusting assurance levels for production
| Assurance level | Use case |
|---|---|
urn:grn:authn:dk:mitid:low |
Quick testing during development |
urn:grn:authn:dk:mitid:substantial |
Production for most regulated data |
urn:grn:authn:dk:mitid:high |
Production for high-sensitivity data |
Other brokers, other test flows
The pp.mitid.com simulator approach is what worked with Idura. Other brokers may expose the test environment slightly differently — some include a built-in test user dropdown, others require requesting test access through support. If you’re using a different broker, check their documentation for “MitID test users” or contact their developer support for the current setup.
For an architectural proof-of-concept on a tight timeline, most brokers also support other Nordic eIDs (Swedish BankID, Norwegian BankID) and Danish NemID legacy in test mode, which sometimes have simpler test flows. The Copilot Studio configuration is identical — only the acr_values parameter changes.
Step 9 — Test the full flow
Once you have working test credentials:
- In the test pane, click the three-dot menu → Restart conversation to clear cached state
- Type a general question first: “Hvilke abonnementer tilbyder I?”
- Agent responds anonymously — no login asked
- Type the authenticated trigger: “Vis min faktura”
- Agent shows the pre-auth message, then a sign-in card appears
- Click sign-in — MitID test screen opens
- Authenticate using your broker’s test identity
- After auth, agent calls the billing API with the token
- Authenticated customer data appears in chat
If login appears but you get a 404 after entering credentials, the issue is almost always in the Token URL or query string template — verify against the OIDC discovery document.
 Example of an authentication test
What it looks like to the user
The end-to-end customer experience:
- Customer opens the agent — no login asked
- They ask general questions, agent answers immediately
- They ask for personal data: “Hvad er min seneste regning?”
- Agent responds: “Jeg skal lige verificere din identitet med MitID.”
- MitID screen appears
- Customer authenticates
- Agent fetches actual billing data and displays it
The whole flow takes about 15 seconds. The customer sees MitID branding throughout — which is a trust signal no other authentication method can replicate in Denmark.
Production considerations
The POC works. Going to production is a different conversation regardless of which broker you choose:
Cost: MitID itself charges per login (~0.28 DKK) — this is the same across brokers. Broker subscriptions vary; production tiers typically start in the low thousands of DKK per year, with enterprise pricing negotiated. Worth getting quotes from multiple brokers and comparing on features, support, and SLA.
Onboarding: Real MitID requires a CVR-registered entity, a named security contact, broker agreement, and MitID’s approval process. Realistically 2–6 weeks.
Broker selection: Things to evaluate include developer experience, Nordic eID coverage if you operate beyond Denmark, branding customization, support quality, hosting region, and pricing structure. The choice usually comes down to which one fits your existing tech stack and team workflow best.
Assurance levels: Production financial data typically requires substantial or high. Verify with your compliance team which level applies to your data category.
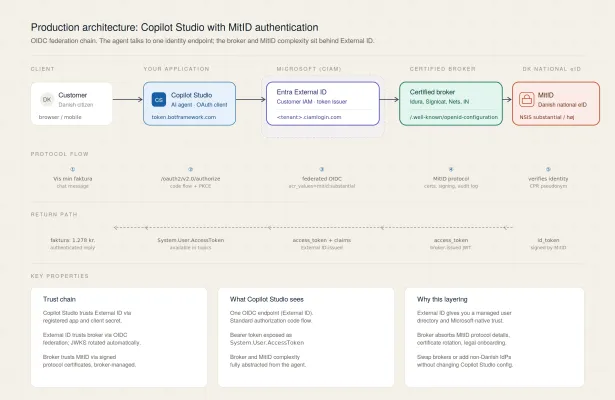
Architecture evolution: For mature deployments, consider Entra External ID as the user directory, with the MitID broker federated behind it. This gives you a Microsoft-native identity layer for non-Danish users (email, social), strong eID for Danish users, and a unified user database. Copilot Studio doesn’t change — it still talks to one OIDC endpoint.
 Broad test flow overview
Why this matters
AI agents are about to flood every customer-facing interaction in Denmark. The companies that get authentication right will own the high-value use cases — billing inquiries, contract changes, account self-service — that drive real business outcomes. The ones that don’t will be limited to FAQ bots that nobody trusts with anything important.
MitID integration isn’t optional for serious Danish customer-facing AI. The good news: the architecture is straightforward, the broker abstraction is clean, and you can prove the concept end-to-end in an afternoon following the steps above.
The cost of not doing this isn’t a technical limitation — it’s a strategic one. Every interaction that requires a customer to leave the agent and go to a portal to verify themselves is a broken experience.
Try it yourself
If you’re building Copilot Studio agents for Danish customers, free sandbox environments from any of the major MitID brokers will let you prototype this in an afternoon. The Copilot Studio configuration is essentially the same regardless of which broker you choose — the steps above will adapt with minor URL changes.
What’s been your biggest challenge integrating European eIDs with AI agents? Which brokers have you worked with, and what’s been your experience navigating the MitID test environment? I’d love to hear what’s working for others.
